
Hallo Ihr Lieben,
ich möchte Euch heute gerne in einer Schritt für Schritt Anleitung zeigen, wie man eine kleine Geschenktasche selber machen kann. Die Idee stammt von den Splitcoaststampers und ich finde, mit so einer kleinen Tasche, kann man recht schnell einem lieben Menschen eine Freude machen, denn sie ist wirklich einfach nachzumachen.
***
Hi dear all,
today I would like to show you step by step, how to make a small gift bag. I found the idea over at the Splitcoaststampers and I think, this bag is a lovely gift for a loved one, because it´s quite quickly and really simple to prepare.
Ihr benötigt folgende Materialien:
- Scor-Pal Bord
- einen Bogen gemustertes Papier, 30,5 x 30,5 cm (12" x 12")
- doppelseitiges Klebeband
- Eyelets oder Brads
- Schere
- Eyelet Werkzeug
- Schleifenband
***
What you need:
- Scor-Pal board
- one peace of patterned paper 12" x 12"
- double sided adhesive tape
- eyelets or brads
- scissors
- eyelet tool
- ribbon

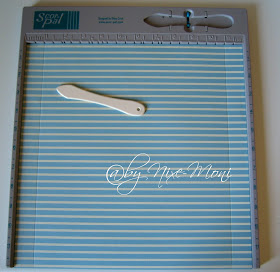
Legt das Papier, mit der Seite die Ihr außen haben möchtet (falls es doppelseitig ist), nach unten auf das Scor Pal Bord und falzt es bei 1" (2,54 cm) und bei 11" (27,94 cm).
***
Put your paper, with the page that you want to have outside (if it´s double-sided), downwards on the scor pal board and score at 1" and 11".

Danach faltet Ihr das Papier entsprechend und fixiert es mit doppelseitigem Klebeband.
***
Then fold the paper at the scored lines and fixed it with double sided adhesive tape.


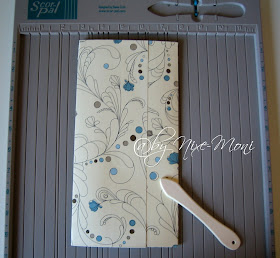
Nun dreht Ihr das Papier um 90° und falzt es bei 3 1/2 " (8,89 cm) und 8 1/2 " (21,59 cm). Auch hier faltet Ihr das Papier wieder entsprechend an der gefalzten Linie ...
***
***
Now turn the paper 90 degrees and score at 3 1/2" and 8 1/2 ". Fold the paper on the scored lines again ...


... und klebt dann die gefalzten Seiten überlappend zusammen, sodaß ein länglicher Schlauch entsteht.
***
***
... and adhere the folded pages overlapped to a flat tube.

Falzt das Papier nun bei 4,5" (11,43 cm), 5" (12,7 cm) und 5,5" (13,97 cm) und achtet darauf, dass die Außenseite nach oben liegt. Danach wird das Papier zuerst in der Mitte gefaltet.
***
Score now at 4,5", 5" and 5,5" and make sure that the outside is pointing to the top. Then fold the paper first in the middle.


***
Score now at 4,5", 5" and 5,5" and make sure that the outside is pointing to the top. Then fold the paper first in the middle.
Faltet das Papier nun weiter an den gefalzten Linien, erst nach links und dann nach rechts und legt dann das Papier so, dass die Außenseite wieder nach unten zeigt.
***
Then fold the paper on the scored lines, first to the left and finally to the right. Now the outside of the paper should be again upside down.
Auf einer beliebigen Seite wird nun ein kleines Stück doppelseitiges Klebeband, in die Mitte des oberen Randes, fixiert. Damit wird die Tasche zusammengeklebt, die nun von alleine stehen sollte.
***
Now stuck a small piece of douple sided adhesive tape in the middle at the top of one page and glue the bag together. It should now be able to stand on its own.


***
Now stuck a small piece of douple sided adhesive tape in the middle at the top of one page and glue the bag together. It should now be able to stand on its own.
Nun ist es fast geschafft ... jetzt werden nur noch die Eyelets mit dem Eyelet Werkzeug angebracht und die Schleifenbänder durchgezogen. Ihr könnt auch Brads verwenden, diese werden dann einfach nur durch das Schleifenband und das Papier gedrückt und entsprechend fixiert.
***
At this point you have almost managed it ...now you only have to fix the eyelets with the eyelet tool and pull the ribbon through the eyelets. You can also use some brads, who just pushed through the ribbon and the paper.

***
At this point you have almost managed it ...now you only have to fix the eyelets with the eyelet tool and pull the ribbon through the eyelets. You can also use some brads, who just pushed through the ribbon and the paper.
Meine Schleifenbänder sind je ca. 30 cm lang und damit es einen schönen Abschluß gibt, habe ich ein ca. 2 - 3 cm breites Stück doppelseitiges Klebeband an das Ende eines jedes Bandes angebracht um es so zusammenzukleben.
***
My ribbons are about 30 cm long and for a great finish I fixed some 2-3 cm wide piece of double sided adhesive tape at the end of each ribbon and stick it together.


***
My ribbons are about 30 cm long and for a great finish I fixed some 2-3 cm wide piece of double sided adhesive tape at the end of each ribbon and stick it together.
Die Tasche ist nun fertig und kann jetzt nach herzenslust dekoriert werden.
***
The bag is now finished and can be decorated to your heart´s content just as you like.


***
The bag is now finished and can be decorated to your heart´s content just as you like.
Rückseite / backside

Vielen Dank für´s Vorbeischauen und ich wünsche Euch viel Spaß beim Nachbasteln.
***
Thanks for swinging by and I hope you have fun making your own gift bag.
***
Thanks for swinging by and I hope you have fun making your own gift bag.
Hugs
Nixe-Moni
Dankeschön für den tollen WS :0))) da werd ich mich mal dran versuchen ;0)
AntwortenLöscheneinen guten Start ins WE wünsche ich Dir
Liebe Grüße
Nicole
Wow - super schön und eine tolle Anleitung.
AntwortenLöschenSabine
Hallo Moni
AntwortenLöschenDas ist ja bezaubernd. Ganz lieben Dank auch für die tolle Anleitung.
Wünsche dir ein schönes WE.
LG Gundi
VERY CUTE, thank you!
AntwortenLöschenRegards,
http://bellaideascrapology.blogspot.com/
Sieht richtig toll aus :)
AntwortenLöschenMuss mir auch mal ein Scor-Pal Board zulegen :)
LG, Lilli
Farina hatte mir so eine Tasche geschenkt, und dank deinem super erklärten WS kann ich dieses Schmuckstück endlich nachbasteln. Vielen Dank!
AntwortenLöschenBeautiful gift bag.
AntwortenLöschenThank you-this is so great. Love your work ♥
AntwortenLöschenHugs and love
Heidi
it's very beautiful, Moni!
AntwortenLöschenhugs, Alina
Super schön, gefallt mir sehr gut.
AntwortenLöschenlg Agnes
Wow Moni, this is wonderful. super job and thanks for the tutorial. I love the way you colored Tilda.
AntwortenLöschenHugs Maz
thanks for this clear tutorial....I just finished my gift bag (must only still decorate it)....yours is very lovely!
AntwortenLöschenxxx Margreet
Thank you so much for these tutorial.
AntwortenLöschenIt's a sweet gift bag!!
greetings, Claudia
So beautiful Moni.
AntwortenLöschenHugs Riet.xx
Gorgeous gift bag, love it! Thanks for the tutorial!
AntwortenLöschenHelen x
This is awesome, thanks for this great tutorial!!!
AntwortenLöschenhugs Yvonne
Hi NIxie, thank you for visiting my blog. I love your bag tutorial and will definitely keep that in mind to make. I'm sure I will need to in the near future! Also, I'm gasping at the cards you made...they are gorgeous! Your coloring is beautiful!
AntwortenLöschenHugs, Kathie
Thanks for this hun it is beautiful
AntwortenLöschenHugs
Jacqui xx
Moni this is absolutely gorgeous, thanks so much for the tutorial :)
AntwortenLöschenhugs Mandy xx
What a lovely bag, so wonderful! Thank you for the tutorial.
AntwortenLöschenHugs Jacqueline
Wow, das Täschchen ist einfach toll geworden!! lg Dani
AntwortenLöschenThank you for a wonderful easy tutorial, I have just made four but must go shopping for large brads and then decorate them.
AntwortenLöschenmerci pour ce tuto je viens d'en réaliser un
AntwortenLöschenbisous sabrina